Ultimate Guide to Kemper Profiling Amps
The Kemper Profiler has revolutionised the world of guitar tone. Using unique, innovative and comprehensive tech, Kemper have made the search for the ultimate guitar sound easier than ever before.
While the Kemper has remained largely unchanged since its release, there’s plenty to think about if you’re looking to buy. In this guide, we’ll highlight the difference between the Kemper models, as well as some of the most common questions you’ll come across.

What is a Kemper Profiler?
The Kemper Profiler (sometimes the Kemper Profiling Amp, but often just called the Kemper) is a unique piece of kit that emulates your favourite amps. But this isn’t quite like a modelling amp; rather than model a sound from scratch, it actively ‘profiles’ the sound.
This means it can analyse any amp, cab or rig and immediately reproduce the tone – within minutes. Not only that, but you get heaps of popular and classic profiles right out the box, so you can start your tonal exploration right away. Once you’ve picked or created your profile, you can then tweak by adding effects, tweaking EQ, amp settings and much more.
Kemper Amp Model Comparison
| Kemper Head | Kemper Rack | Kemper Powerhead | Kemper Powerrack | Kemper Stage | |
| Built-in amp profiles | 200 | 200 | 200 | 200 | 200 |
| Built-in effects | 72 | 72 | 72 | 72 | 72 |
| Inputs | Main input, alternative input, return input, S/PDIF, MIDI, USB, Ethernet | Main input, alternative input, return input, S/PDIF, MIDI, USB, Ethernet | Main input, alternative input, return input, S/PDIF, MIDI, USB, Ethernet | Main input, alternative input, return input, S/PDIF, MIDI, USB, Ethernet | Main input, return input, S/PDIF, MIDI, USB, Ethernet |
| Outputs | Left & right balanced, left & right unbalanced, monitor out, direct output/send, headphone out, S/PDIF, MIDI, USB, Ethernet | Left & right balanced, left & right unbalanced, monitor out, direct output/send, headphone out, S/PDIF, MIDI, USB, Ethernet | Left & right balanced, left & right unbalanced, monitor out, direct output/send, headphone out, S/PDIF, MIDI, USB, Ethernet | Left & right balanced, left & right unbalanced, monitor out, direct output/send, headphone out, S/PDIF, MIDI, USB, Ethernet | Left & right balanced, left & right unbalanced, monitor out, direct output/send, headphone out, S/PDIF, MIDI, USB, Ethernet |
| Built-in Class-D 600W power amp | No | No | Yes | Yes | No |
| Height | 217mm | 139mm | 217mm | 139mm | 85mm |
| Width | 378mm | 483mm | 378mm | 483mm | 470mm |
| Depth | 173mm | 220mm | 173mm | 220mm | 260mm |
| Weight | 5.32kg | 5.00kg | 6.50kg | 6.18kg | 4.60kg |
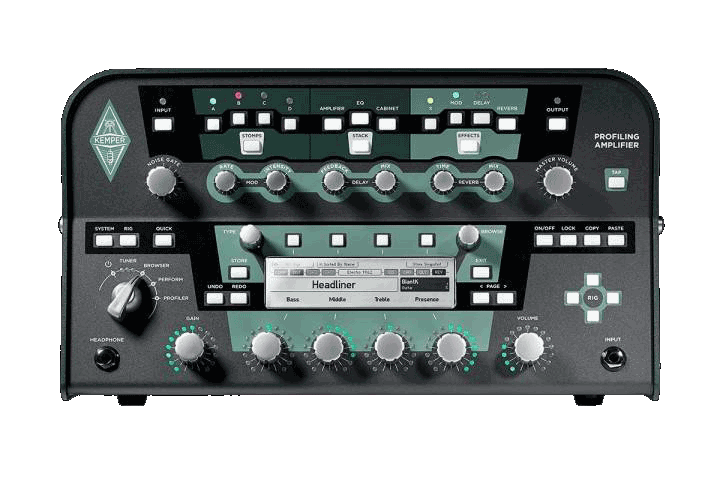
The one that started it all. As mentioned earlier, the Kemper head is the original, and has remained pretty much unchanged since release. It’ll sit neatly on top of any cab, desk or stand, and weights just over 5kg – the ultimate tonal solution for the nomadic guitarist.
What do you get when you combine the Kemper Profiler head with a 600W Class-D power amp? Sorry, no punchline – it’s the Powerhead. A standalone Kemper can’t be plugged directly into a guitar cab, but the Powerhead can be. This makes it a slightly more diverse gigging solution. It’ll pump out 600W at 8ohms, and 300W at 16ohms.
The rack version of the Kemper is exactly what you might think. The same array of powerful features and connectivity, but in a versatile rack format. At 483mm wide (19”) it sticks to the standard rack format, with a 3RU height. This means it’ll fit neatly alongside any guitar, studio or live rack-mounted gear that you use.
See above, the same applies. This is the 19” rack version of the Kemper with a 600W Class-D power amp built-in. This is arguably the most versatile version of the Kemper, as it’ll fit into any studio or gigging setup and be compatible with any backline.
The Kemper Stage is the floorboard version of the Profiler. The Kemper range has proved hugely popular with guitarists the world over, but a compact floor version has been requested and rumoured for years. Now that it's finally arrived, it exceeds expectation on paper; it's a fully-fledged Profiler in pedalboard form!
Why do I need a Kemper?
The Kemper Profiler is an undeniably powerful bit of gear. But how can you put that power to use in your own rig? Here’s a few reasons why a Kemper might work wonders for you:
Hundreds of tones in one place
Hundreds of classic amps faithfully recreated using Kemper’s unique profiling algorithms. Plus you can add your own, download more and purchase artist/brand packs online – and they all fit into a single box.
Advanced tonal sculpting
Beyond its complex profiling capabilities, the Kemper offers unprecedented control over your sound. Mic positioning, sag controls, before/after-amp effects, isolating your preamp sound – the works.
A practical gigging solution
All of the Kemper units weigh in at under 7kg. They’re also 19” wide or less. This makes them a handy, on-the-go tonal solution – without any compromise on sound.
Perfect for the studio
Imagine owning 200 classic, bestselling and cutting-edge amps. Your rent would be through the roof. Enter the Kemper, cramming it all into a box the size of a toaster – dig it?
It’ll fit into any rig
Extensive inputs/outputs and onboard tonal tweaking options ensure that the Kemper will play nice with any rig. Whether you’re practicing at home or depping for a stadium gig, it’ll get the job done.
How do I use a Kemper?
So you’re interested in a Kemper – but what are they actually like to use? We thought it’d be worth highlighting a few points on how they work and what they’re best for.
How to record with a Kemper
There’s no doubting that one of the best applications of the Kemper amp is recording. Being able to tap into just about any sound you like in the studio is invaluable, and the Kemper is pretty much built to do it perfectly.
There are a number of ways to record your Kemper:
- Stereo out using the main outputs, either XLR or TS (1/4” jack). This is arguably the easiest way to record your Kemper in full stereo.
- Record using the S/PDIF for more digital sample rate options. This is great for working with high-quality projects in your DAW – you can choose from 44.1kHz, 48kHz, 88.2kHz and 96kHz.
- Use the direct output to track a clean (unaffected) guitar signal that can be used for re-amping/post-processing. This can also be done alongside the other recording methods for extra flexibility.
Want to know a little more about recording with a Kemper? Check out our blog: Is A Kemper Better For Home Recording Than A Real Amp?
A guide to Kemper Controls
At first glance, the Kemper control interface can look a little intimidating. Fear not – it’s not as complex as it looks, despite the amount it can do.
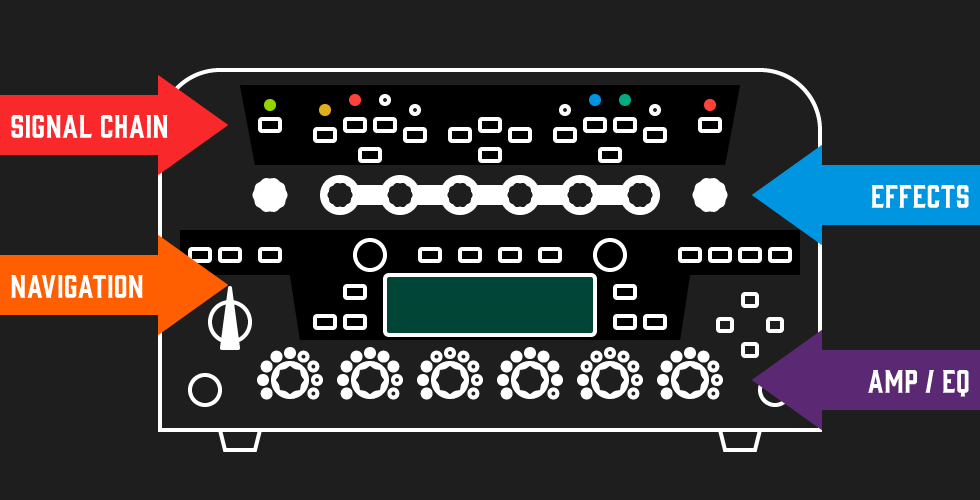
Realistically, we reckon you can summarise the control panel into 4 main sections. This isn’t gospel, and it might not be how the Kemper manual describes it – but it’s a good place to start:
Signal chain
Along the top of the control panel, starting with the Input button and ending with the Output button. This section lets you control your before-amp effects, your preamp/EQ/cab sections, and finally your after-amp effects. It also lets you tweak your input and output settings.
FX controls
Just below the signal chain section, these controls start with Noise Gate on the left, and end with Master Volume on the right. In between, you’ll find controls for modulation, delay and reverb. This includes the usual suspects like rate, feedback and mix.
Navigation
This is the largest section of controls, and the one that might take the longest to familiarise with. It encompasses everything from the Kemper’s mode selection, profile menus, settings and more. Once you work this bit out, anything is possible!
Amp/EQ controls
Below the navigation controls, you’ll see a Headphone output on the left, and your main Input connection on the right. In between are six controls, which are similar to what you’d find on an amp. Gain, Bass, Middle, Treble, Presence and Rig Volume.
Kemper amps can be purchased standalone, or with built-in power amps. In some cases, they even come with the Kemper Remote, a footswitch designed to give you full performance control.
But it doesn’t end there – there are plenty more accessories you can use to maximise the versatility of your Kemper. There’s the Kemper bag, specially designed to keep the Head versions safe and sound. You can also pick up an additional 322 profiles courtesy of The Amp Factory, giving you over 500 profiles to play with before you’ve even started!
Then there’s MIDI switchers. These function in a very similar way to the Kemper Remote, allowing you to easily program your favourite settings and switch between them.
For more info on Kemper accessories, check out their website.
Kemper Profiler FAQs
Can I use a Kemper instead of an amp?
Yes, to put it simply. This is arguably the whole point of owning a Kemper – to have access to hundreds of sounds and near-unlimited tonal tweaking options. This is easily one of the most powerful bits of amplification hardware on the market. And remember, it doesn’t just give you loads of sounds to play with – you can also profile your own favourite sounds!
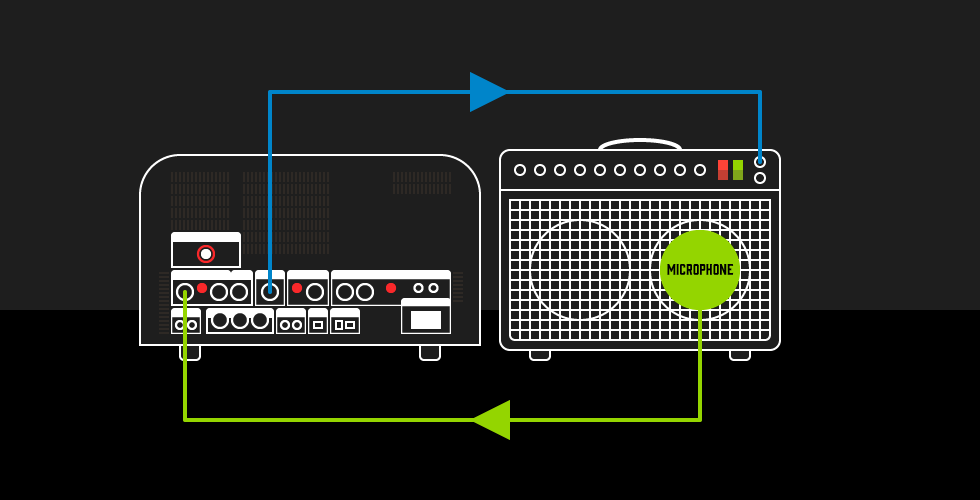
How do I create my own Kemper amp profiles?
This is easier than it might sound.
- Send a signal from the ‘Direct Output / Send’ connection on the back of the Kemper to your chosen amp.
- Place a microphone in front of your amp, in your chosen position.
- Send the microphone signal back into the ‘Return Input’ connection on the back of the Kemper.
- On the Kemper’s main navigation knob (above the Headphone socket), choose ‘Profiler’ mode.
- Follow the steps on screen with the Profiling Assistant – this includes choosing clean or distorted depending on your chosen amp.
- Set your amp tone and level until you’re happy.
- Hit the ‘Start Profiling’ button – you’ll hear a series of noises and tones that the Kemper will process.
- Now you have the option of refining the sound with a bit of playing.
- Hit the ‘Store’ button, enter your settings and a name, and hey presto – your profile is ready!
Here’s a video of our pal Rabea using a creative microphone solution to profile some Victory amps:
Can I use a Kemper with a guitar cab?
Yes, as long as you have a power amp. This could mean getting one of the powered Kemper Profiling amps, or you could use an external power amp.
This is because guitar cabinets are passive, and require external power to produce sound. Don’t try and plug an unpowered amp (or Kemper for that matter) into a cab, as it’s potentially dangerous!
Alternatively, you could use an active cabinet. Some manufacturers make active FRFR (full range flat response) cabinets, which have their own internal power source. They’re also designed to have a broader frequency range and more of a blank canvas sound. This means you can use your detailed profiles without the cabinet altering the tone in any way.
What’s the best guitar cab for a Kemper?
Any cabinet will do, but bear in mind that cabinets play a huge part in the sound. You can easily switch off the Cabinet section of your profile in the Signal Chain control panel (see above), so the Kemper acts as a sort of isolated preamp.
Or as mentioned above, an active FRFR cab is a really popular solution for modelling and profiling amps. Check out some popular options below:
Does my Kemper need a power amp?
See above – your Kemper will need a power amp if you’re going to use it with a traditional guitar cab. If it’s a powered Kemper, then you’re all set.
Can I run a Kemper straight into a desk or PA system?
Yes indeed. On the Main Output section on the back panel, you’ve got 2 x XLR outputs and 2 x TS jack outputs.
How can I download extra Kemper profiles?
You can either buy new profiles or download user-generated profiles on Kemper’s Rig Exchange. There’s literally 1000s to choose from – go nuts!
More info
You might just be feeling even more excited about your Kemper purchase than you were before. Not only that – but hopefully you’re feeling more informed too.
Check out the full Kemper Profiler range here, or if you’d like to read more of our buying guides, you’ll find them here. Happy shopping, folks!